Magnificence in the Abyss
I have spent an entire lifetime fascinated by space. I'd like to think that, if my early life had taken a different path, I would have ended up in a space-focused career. Still, I one day hope to take my software engineering skills into a space-adjacent industry.
For now, though, I'm happy to settle for amateur astronomy. I've owned a 5-inch Newtonian telescope for about a decade—a gift from my wife. But I've rarely had the opportunity to use it, and it has only allowed me to view our solar neighbors. I didn't realize Saturn was my favorite (not-Earth) planet until that scope revealed it suspended in nothingness, hanging out with its rings and a few little dots (a subset of its many moons). That said, even Saturn couldn't compete with our Moon; that little newt is perhaps perfectly suited for Lunar astronomy, resolving the crispiest of details.
The limitations of that scope, though, left me wanting to see deeper into space. Recently, life circumstances have allowed me room to explore that desire through astrophotography. Starting out, I was a bit skeptical: cameras can spend much more time capturing many more photons than eyeballs, but I was worried the tangibility of direct visual astronomy would be lost. Thankfully, I found that owning the end-to-end process of target acquisition, photon capture, integration, and processing allows my brain to experience the same "holy shit" feeling that I feared missing out on.
Peering Through the Black
This post will detail my journey into the hobby, but I'd first like to share some of my early images.
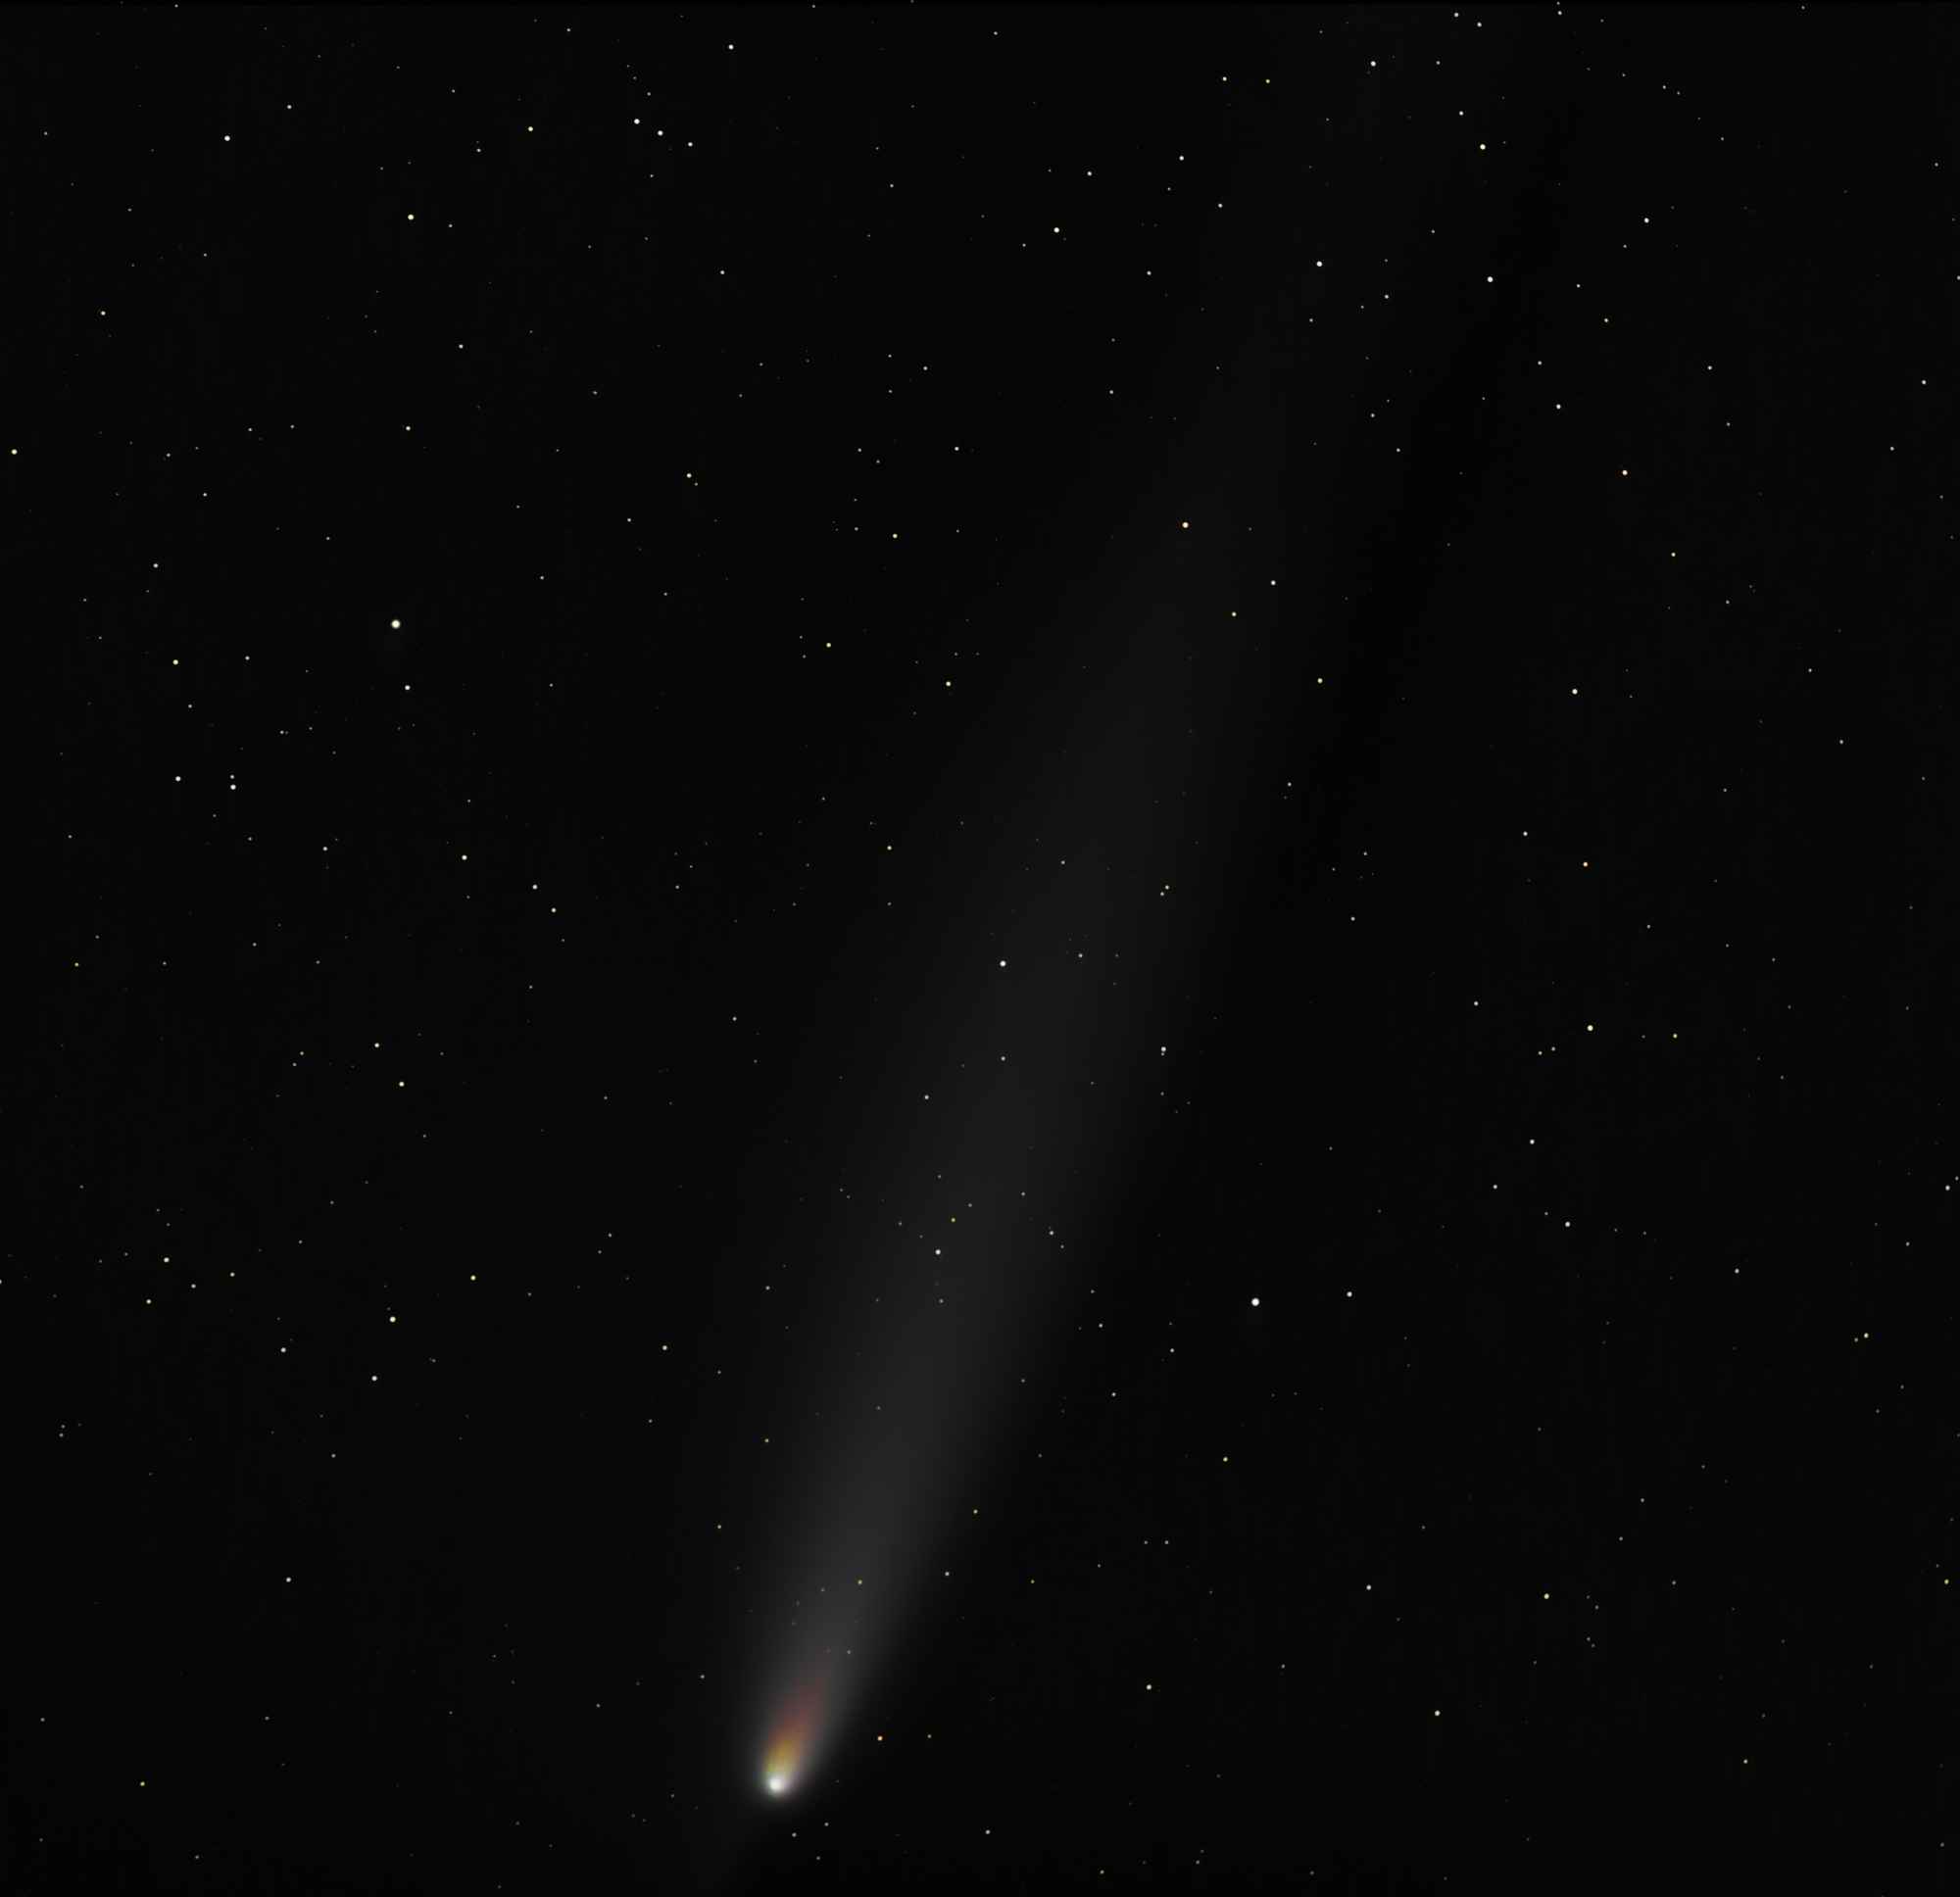
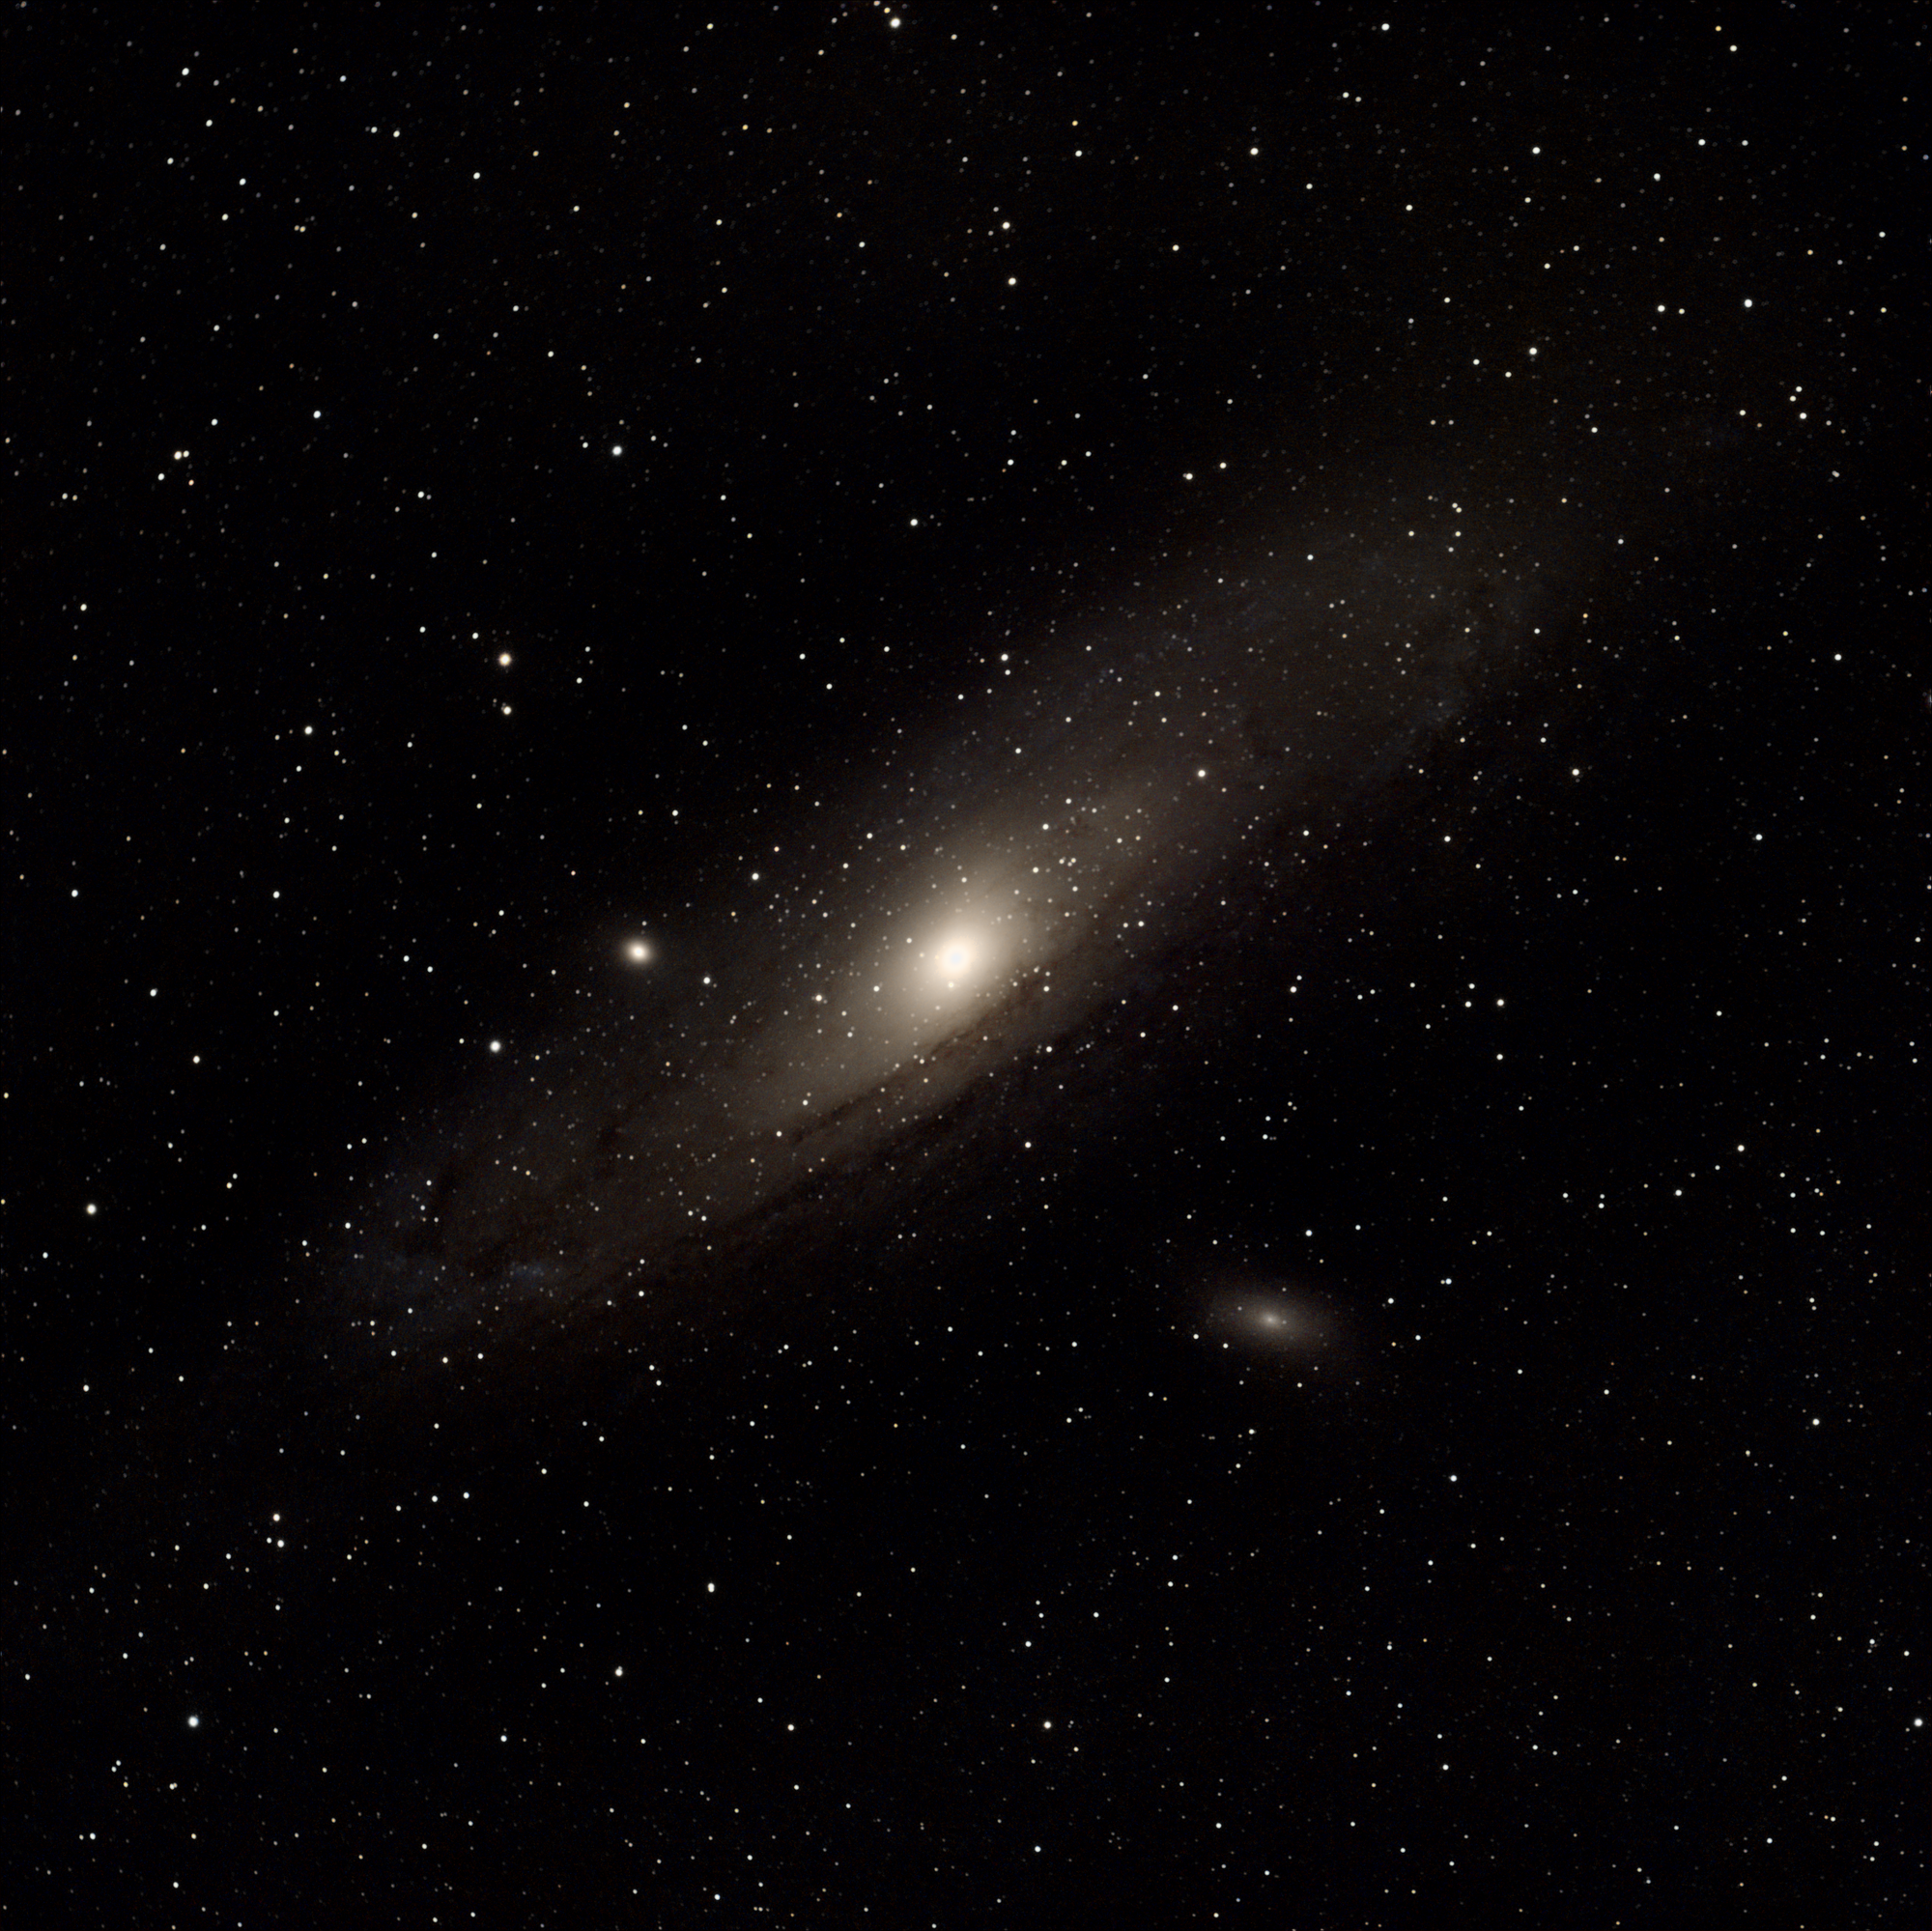

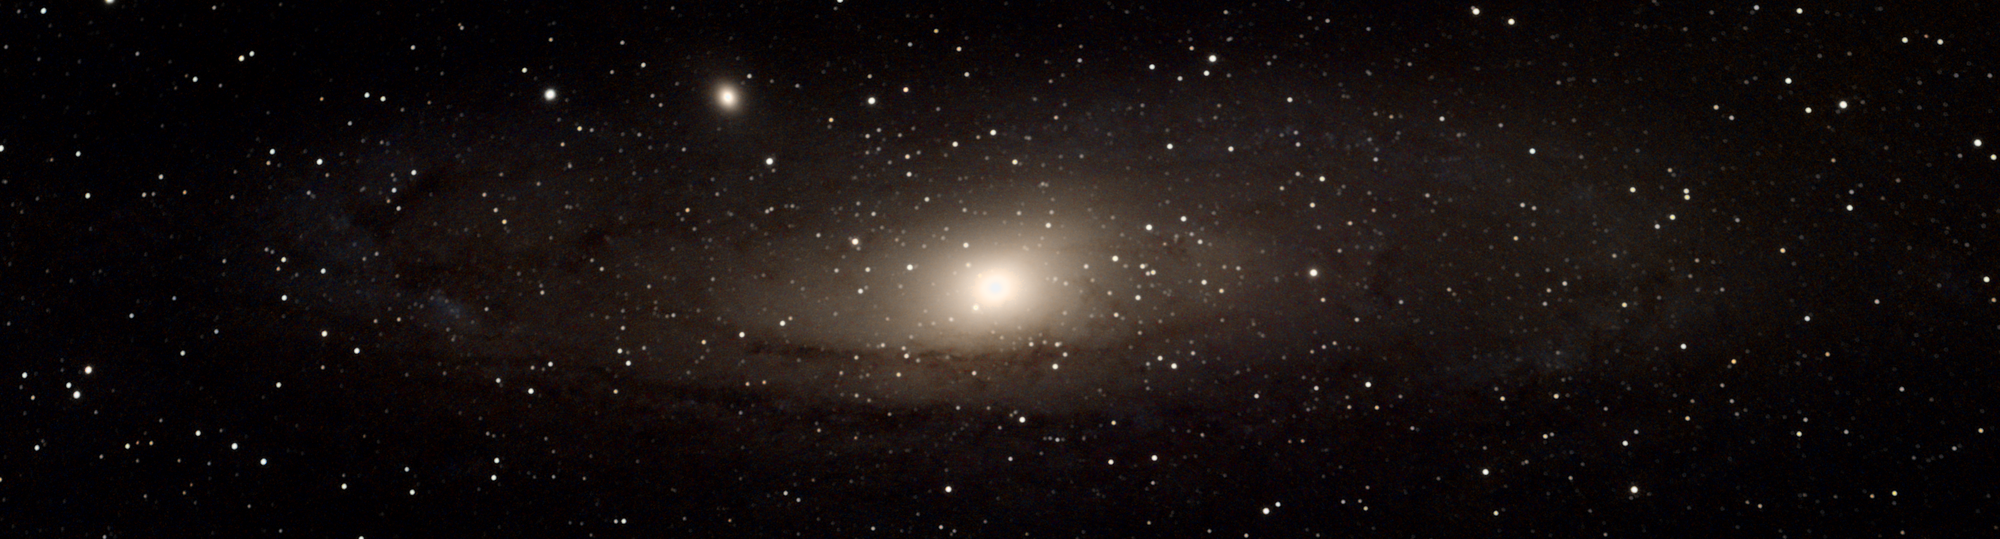
All of these images were taken with my current Redcat 51 rig from Bortle 6 San Diego skies. They were stacked with DeepSkyStacker and processed with Siril.
Inspiration
Near the end of 2022, I happened upon the Astrobiscuit YouTube channel and binged a bunch of his videos. His content was my first real exposure to the idea of astrophotography as a hobby, and I became interested in wanting to try it out. In the back of my mind I wanted to buy a decent rig, but knew the cost wasn't really justifiable.
Back then, I was living in downtown San Jose with no yard and not much opportunity to see dark skies. Moreover, a few months later I found out my role at Google had been cut due to layoffs. This, for obvious reasons, meant pursuing a rig would've been a poor financial decision.
Fast forward to August 2024—about two months before this post—and I'd found myself relocated to San Diego and working as a Security Engineer at Amazon. I had finally settled in after a long and challenging move, had refilled my emergency fund, and decided that it was time to take the plunge.
Into the Deep
Watching AstroBackyard videos had convinced me that an old DSLR and a simple star tracker was enough to get started in deep space astrophotography, so I borrowed my wife's old Canon Rebel T1i to go along with a new SkyGuider Pro (SGP) and a refurbished Redcat 51 MK1.5. I also picked up a William Optics 50mm UniGuide scope, a ZWO ASI120MM Mini guide camera, and a ZWO ASIAIR Plus.
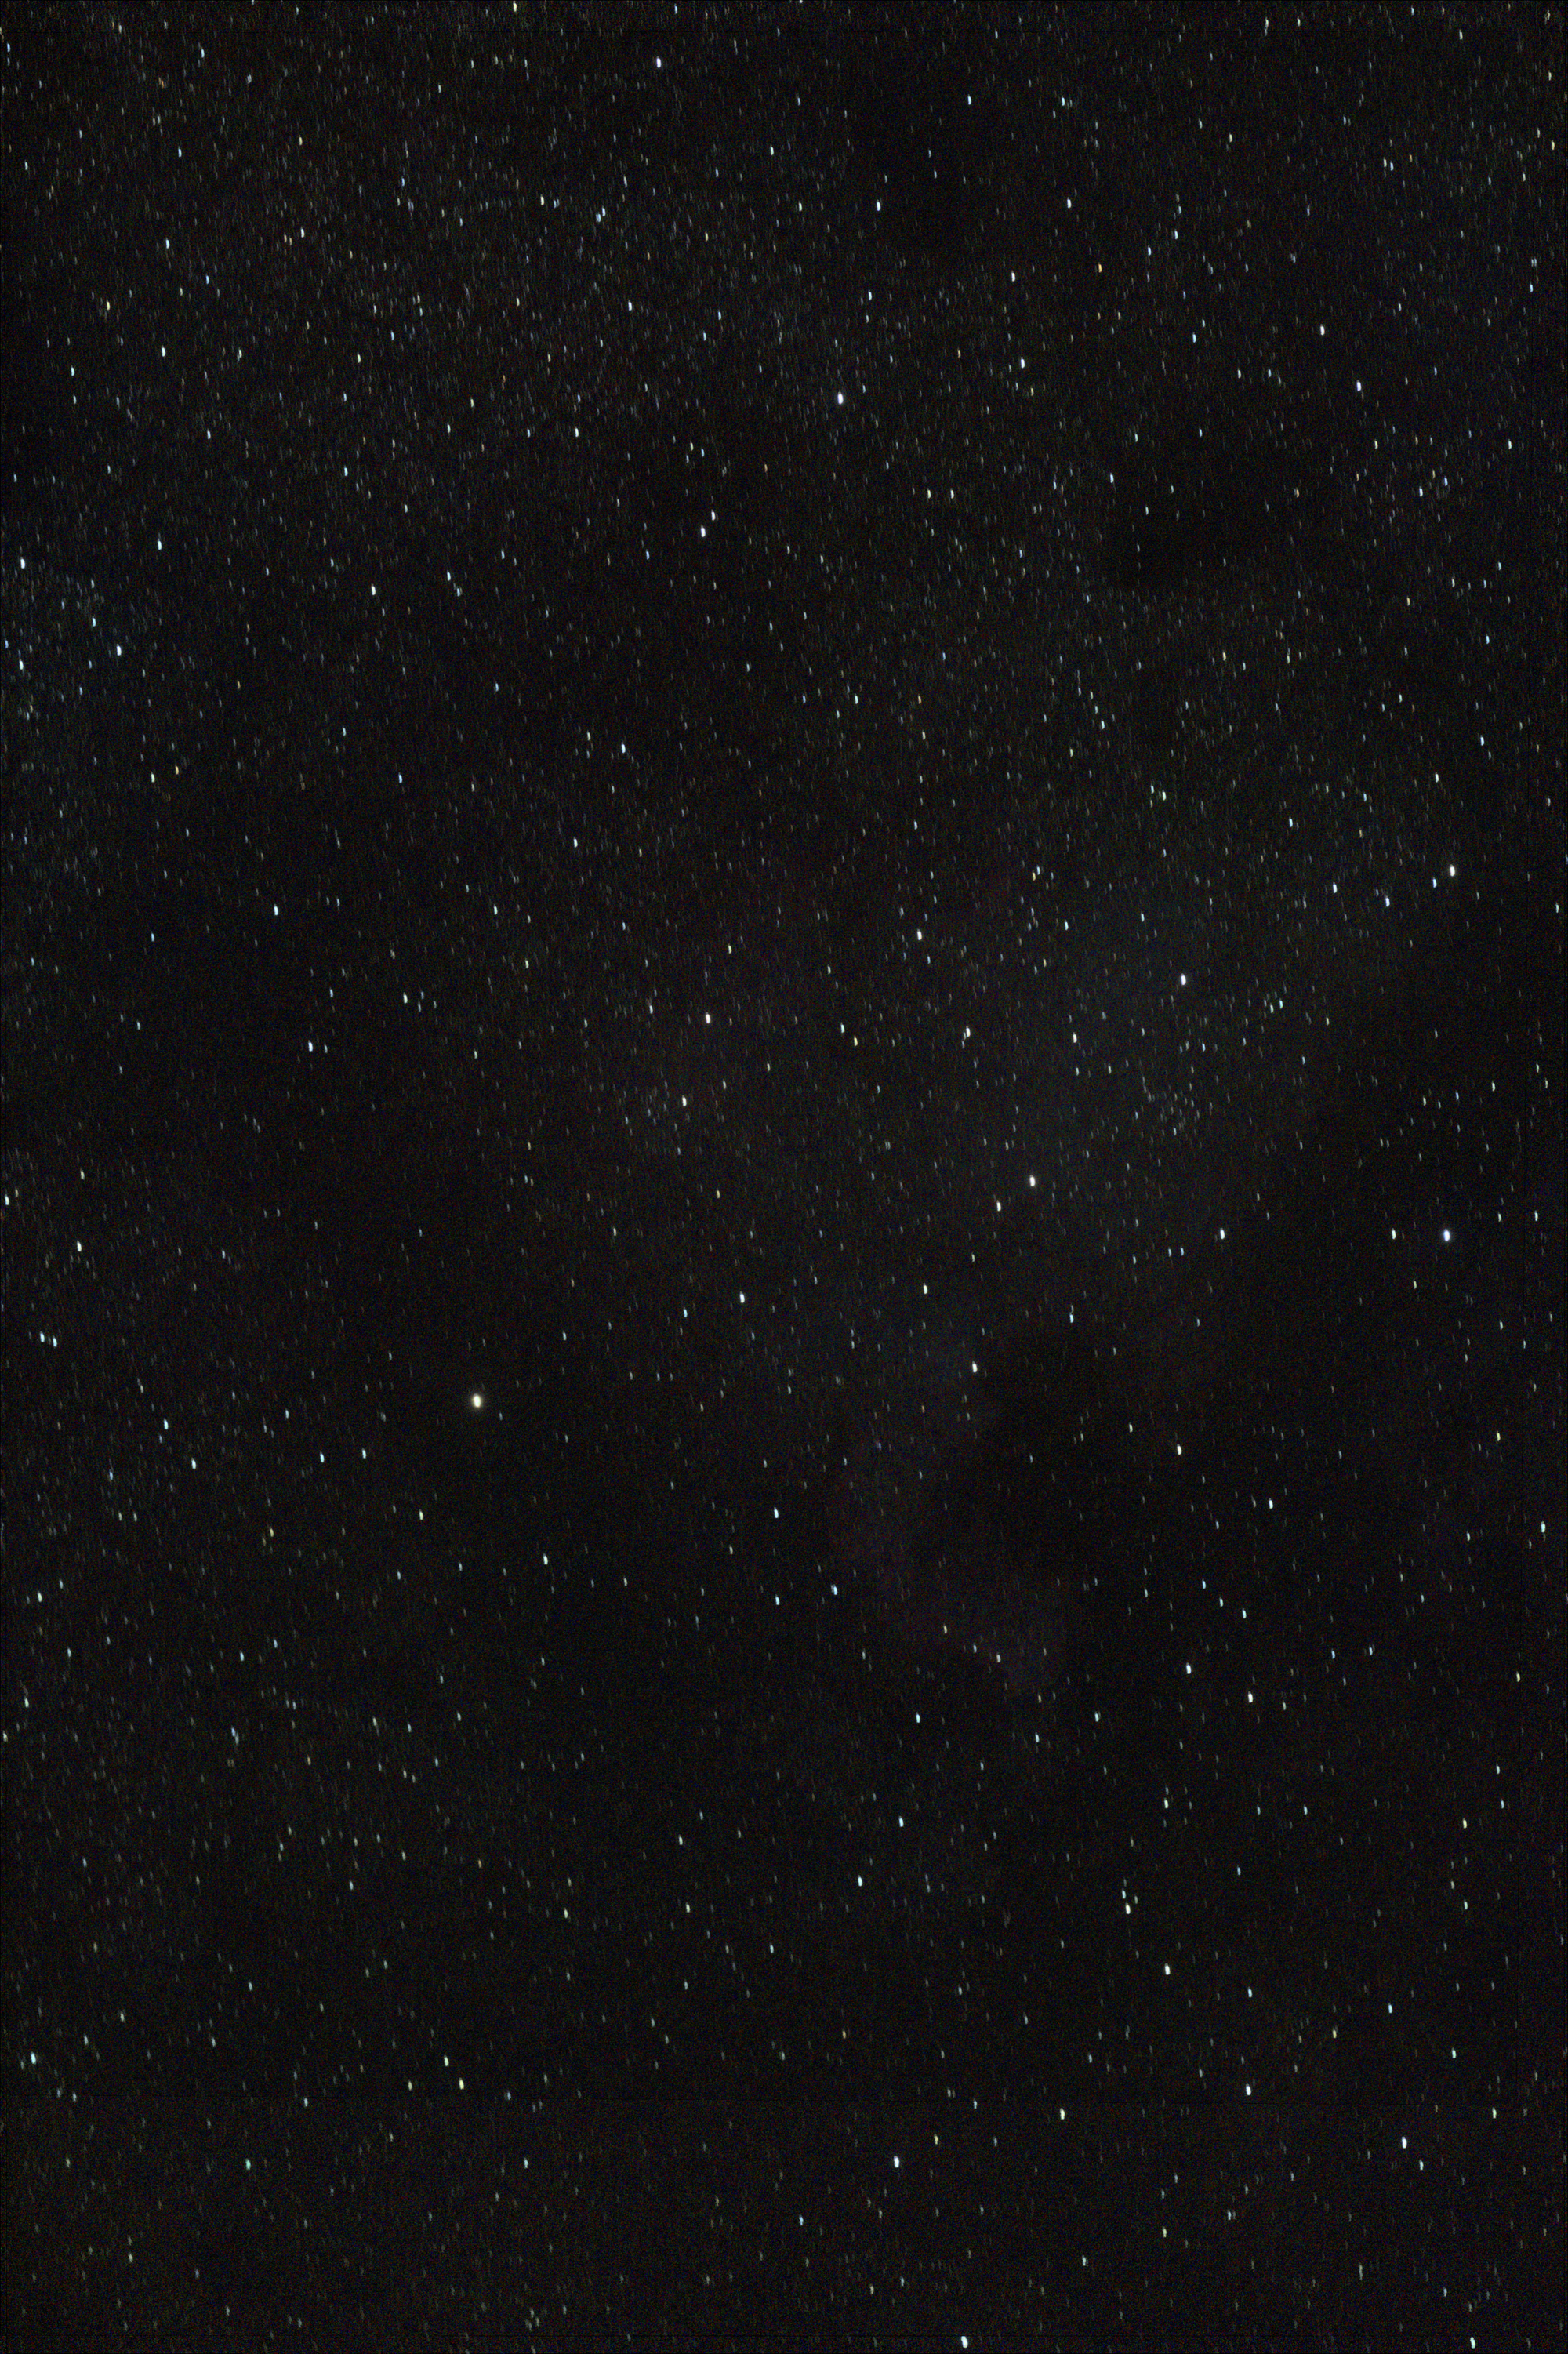
Here is the best image I managed to capture with that setup.
I had mixed feelings about the rig. I really liked the ASIAIR, and its all-sky polar align allowed me to get a decent polar alignment even though my yard didn't have line-of-sight to Polaris. The DSLR was great to get the feel for taking pictures and learning about exposure times and stacking, but its age coupled with the fact that it wasn't made for astronomy meant I was hitting its limits pretty much right away.
In the rare cases that I could get the ASIAR and SGP to play nice with each other, the limitation of only controlling one axis meant that an imperfect polar align was obvious in relatively short exposures, even with auto-guiding chugging away.
The imperfect polar alignment is extremely obvious when looking at the stars in the image, and that is in addition to the horrible signal-to-noise ratio that permeates the background looking like rainbow salt-and-pepper. I have no doubt a more patient person that myself can work wonders with a SGP and a DSLR, but this was the best I could manage. That is especially considering the 30+ minutes I had to spend on manual target acquisition, since GoTo isn't an option with the SGP.
Come Clarity
I made the choice to return the SkyGuider and purchase a ZWO AM3, which I decided on after hearing good things about the AM5—the AM3's older brother—from YouTuber Peter Zelinka. In combination with the ASIAIR, this was the best purchase of my journey. Polar alignment went from a fiddly half-hour-long process to something that took less than ten minutes for high accuracy. Control of two axes meant guiding could pick up the slack on a sub-par alignment, and target acquisition started happening from my couch in seconds.
My exposures went from 90 seconds with streaks to 5 minutes with pinpoint stars, and even 10 minute exposures would have been fine if the 15-year-old DLSR didn't return pure red noise when exposing for more than 5 minutes.
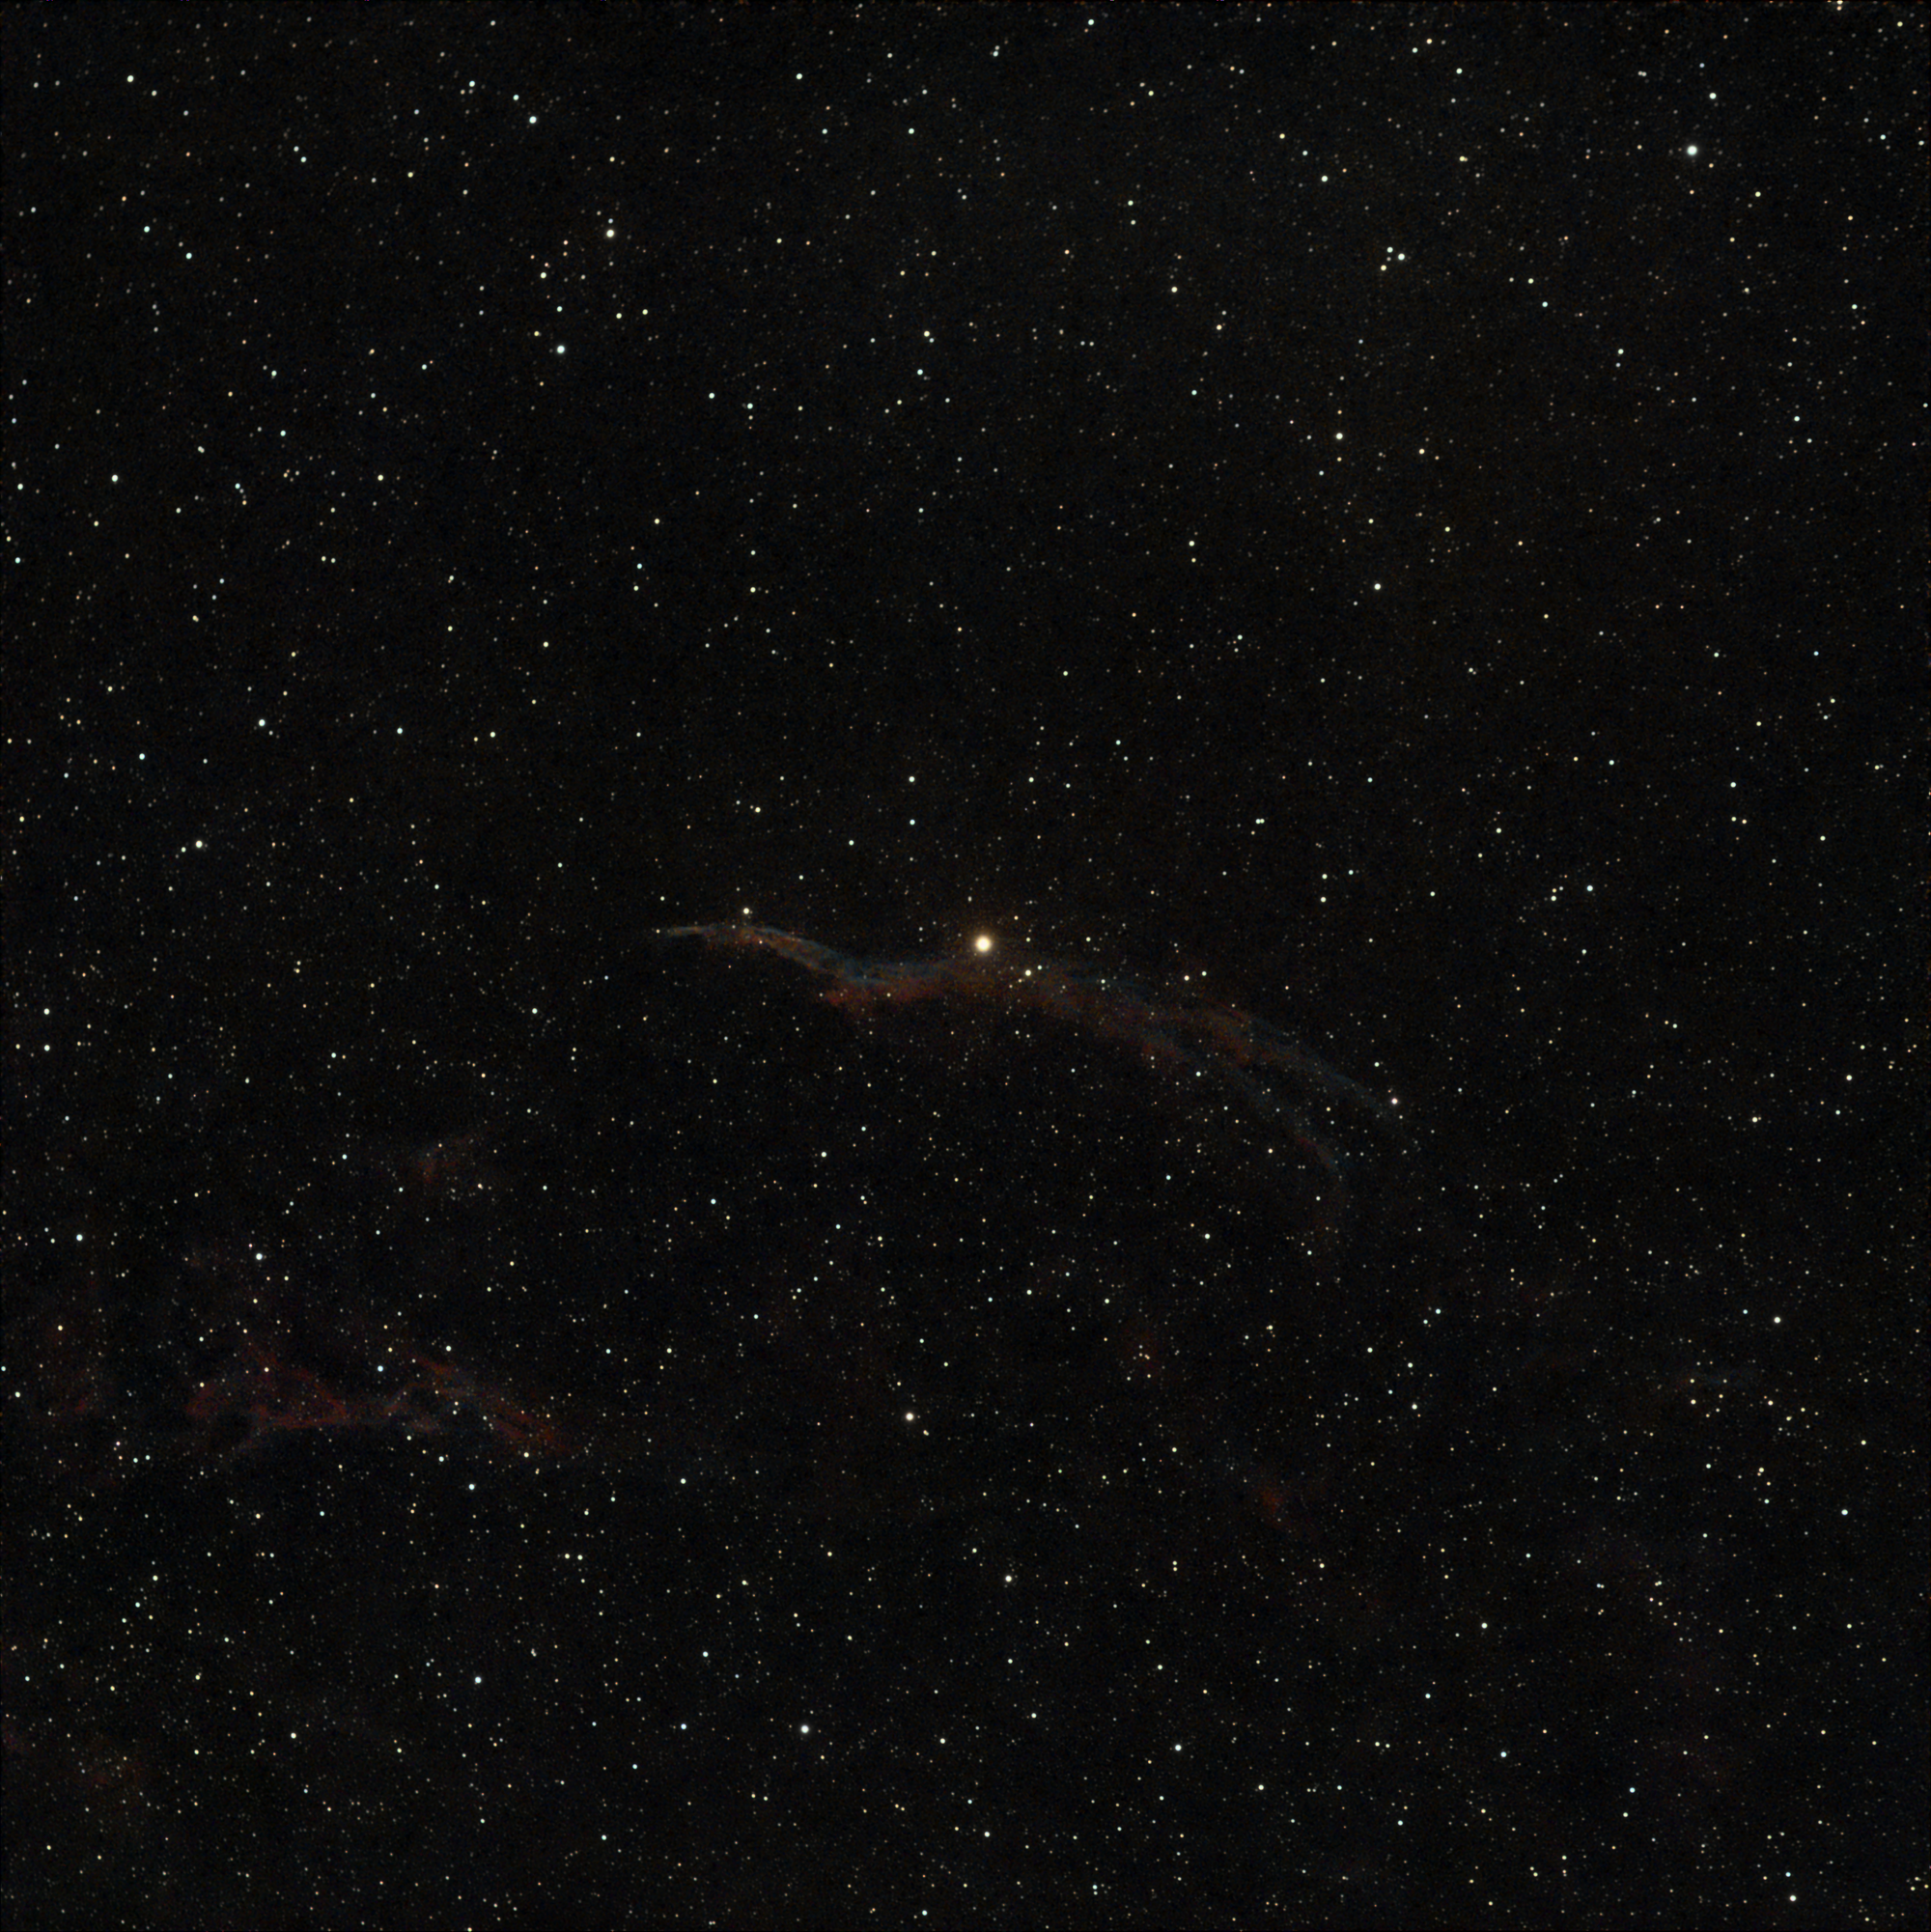
As you'll see below, my images became much sharper. Processing them, though, still required a lot of effort and color correction.
At this point I was feeling pretty good about my results, and the time that was freed up by ZWO's suite got spent on more thoughtful shooting, more targets, and better processing.
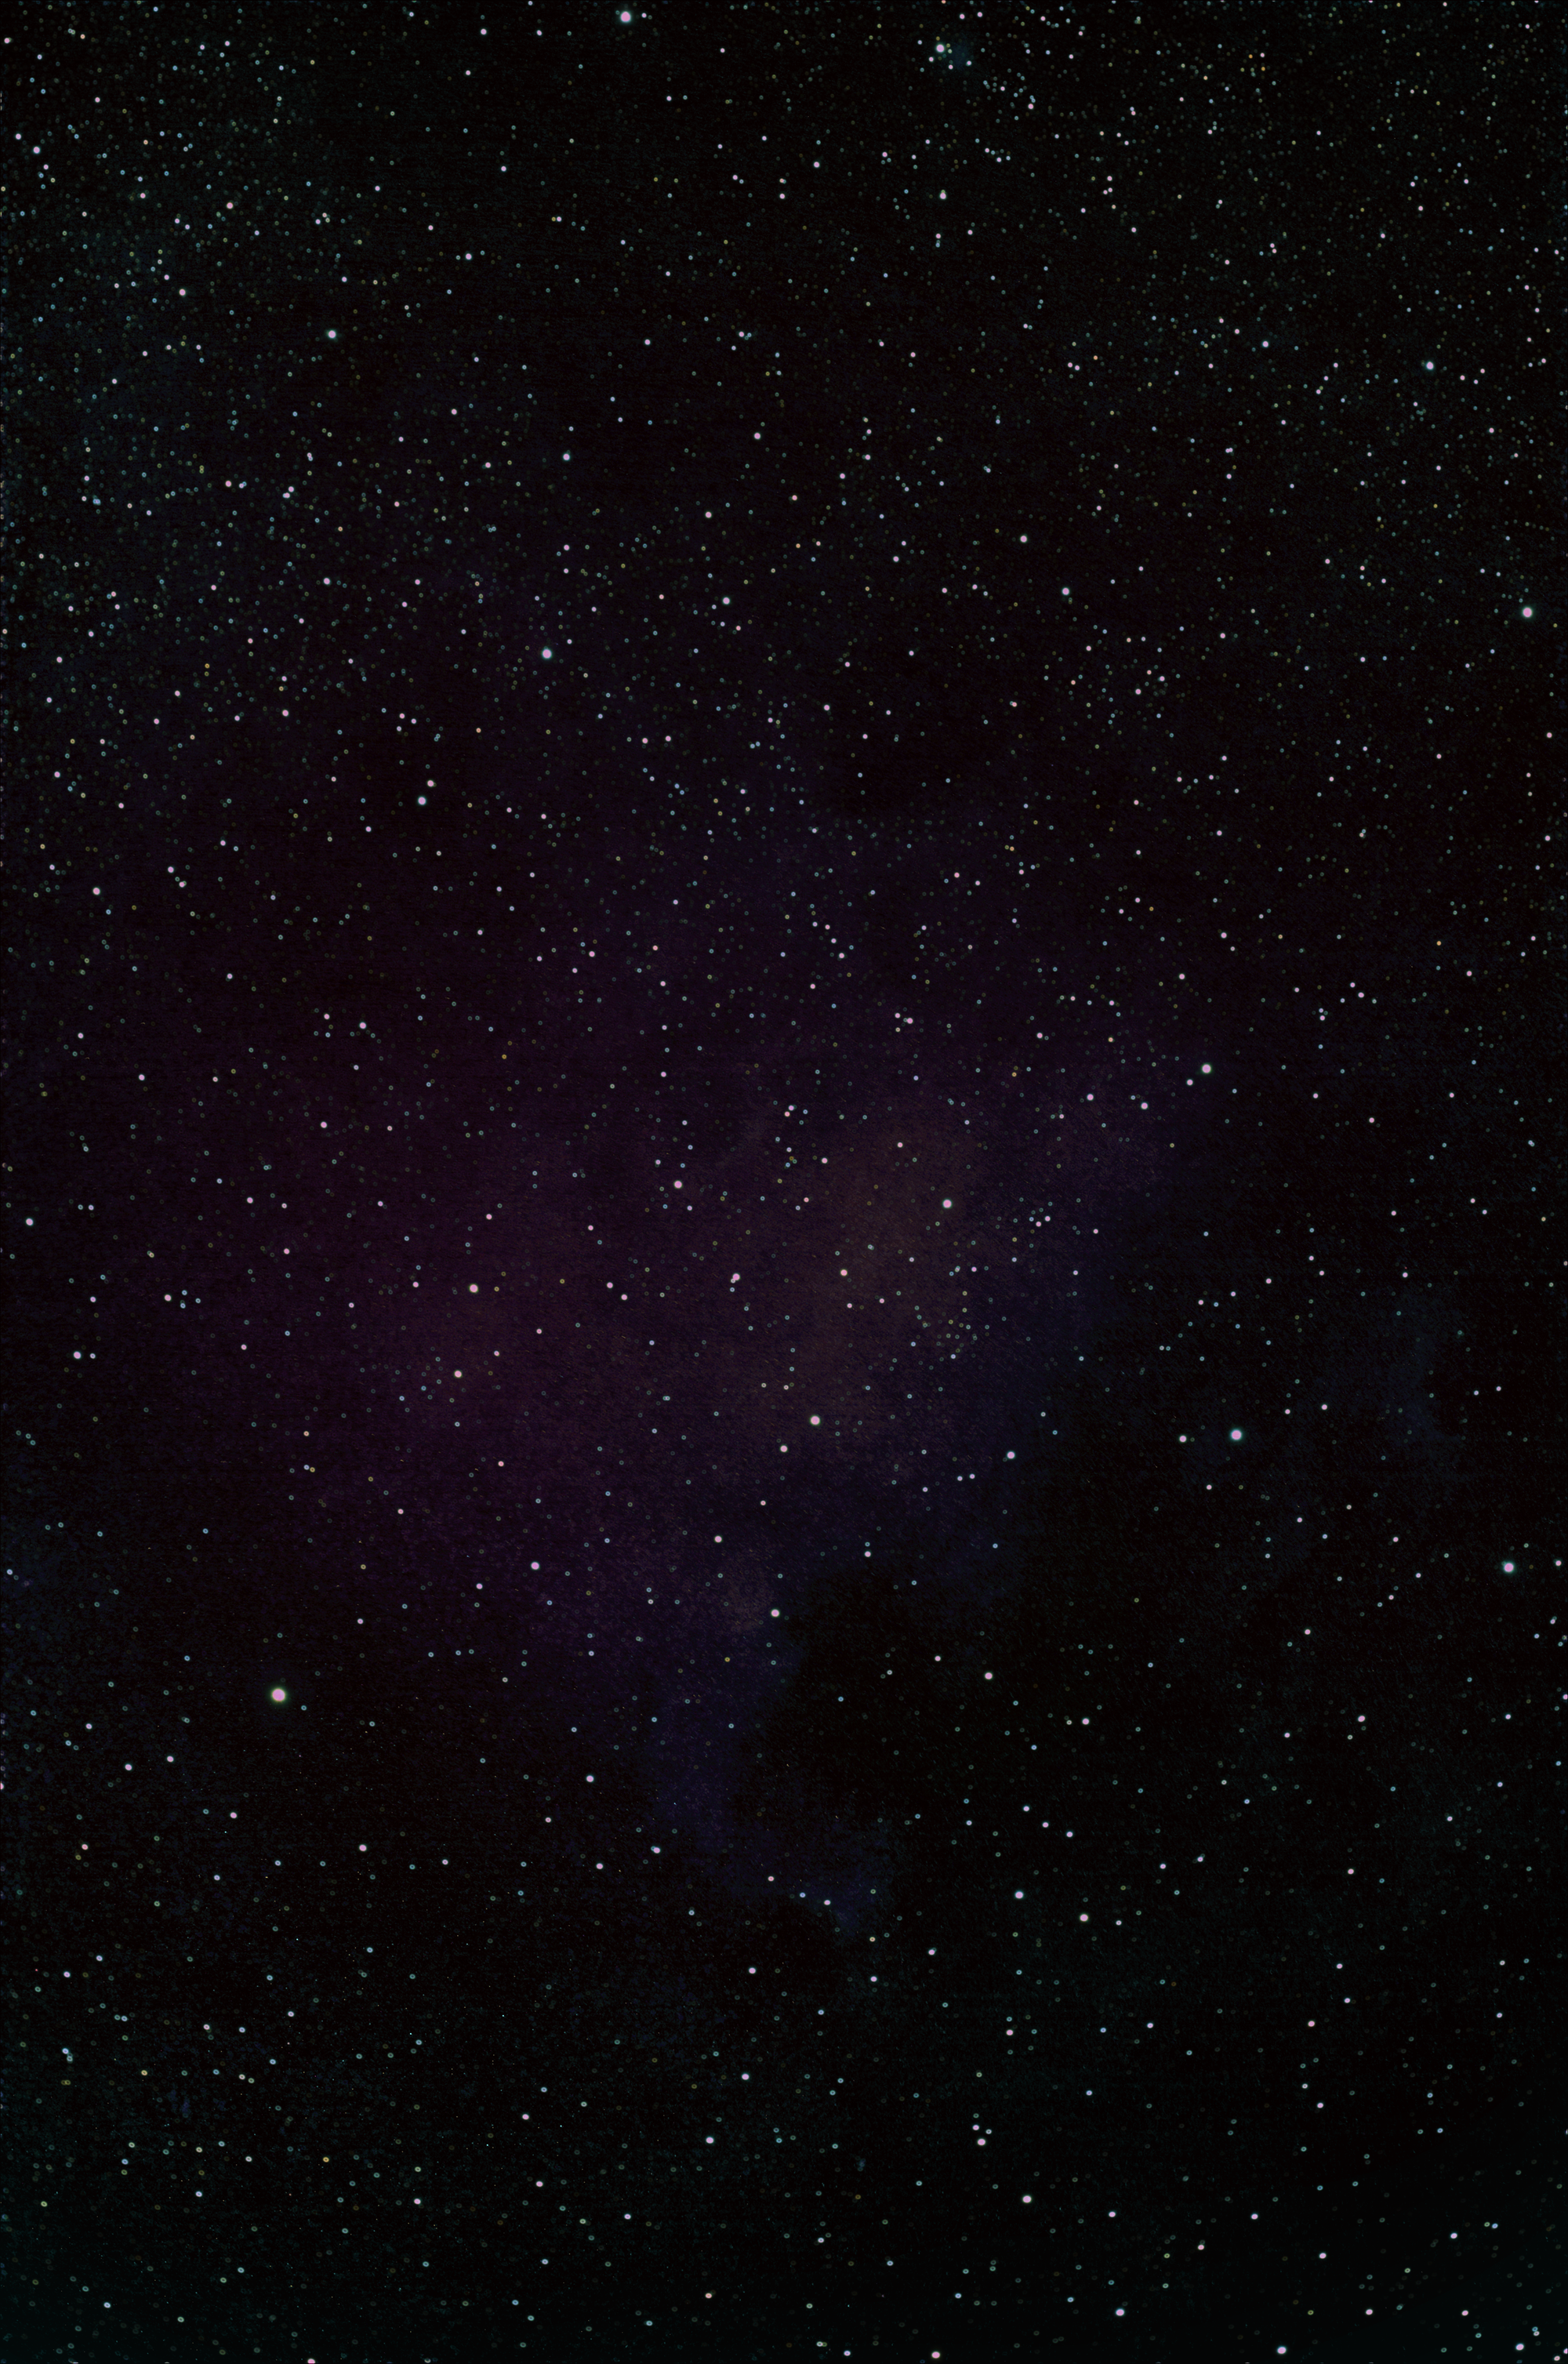
On the same night that I took the previous image, I decided to GoTo Andromeda on a whim. With 30 minutes of exposure, I was able to get this image.
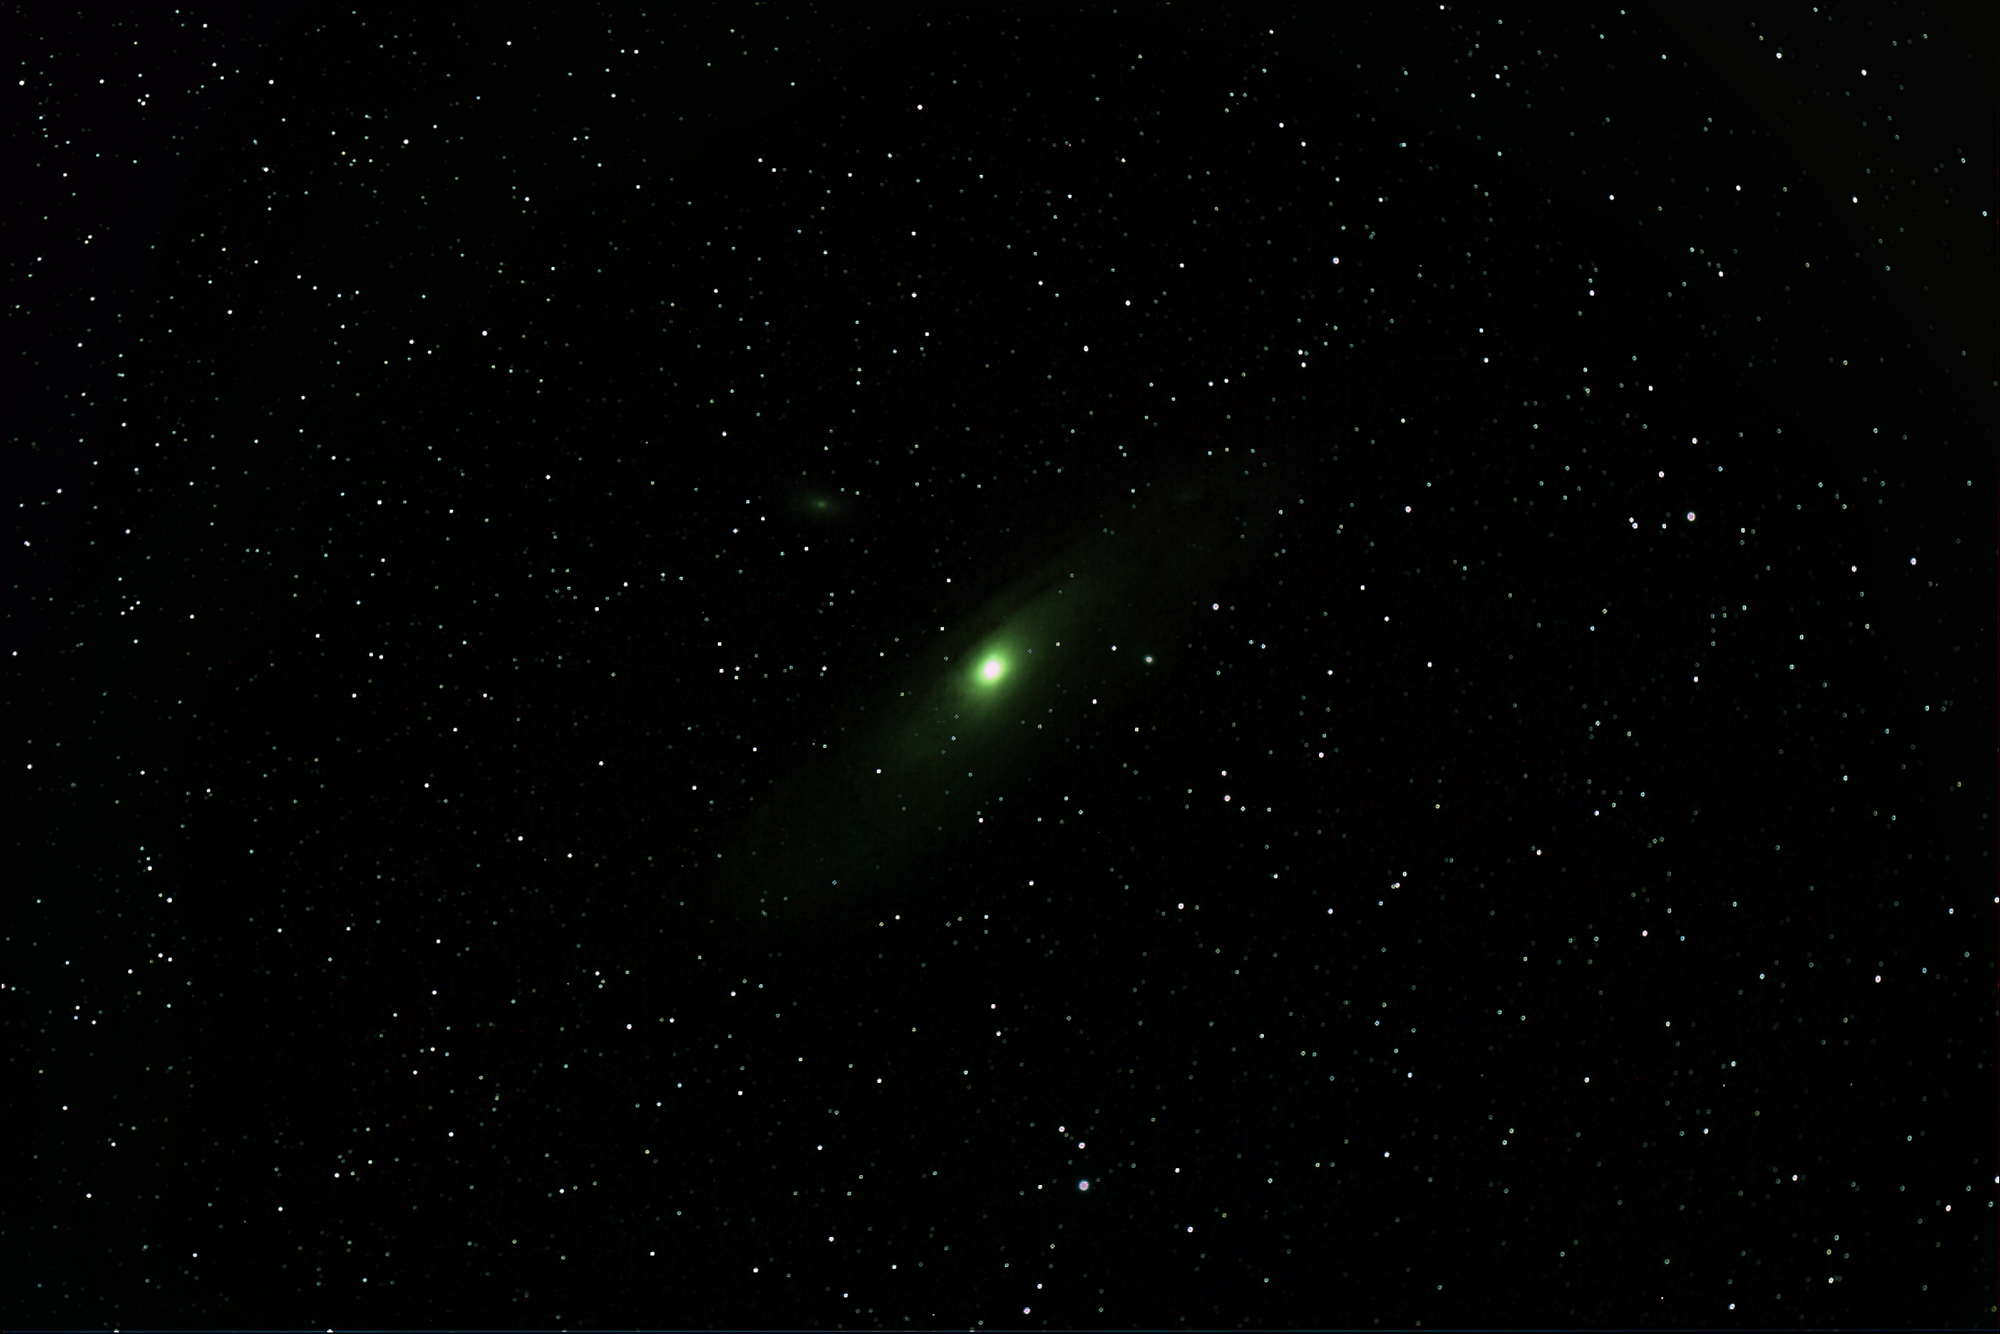
At the time, this blew me away! There it was, our intergalactic neighbor, and I had collected the photons from an area of the sky that looked absolutely empty to my eyes. I couldn't believe that I could see the galaxy so clearly.
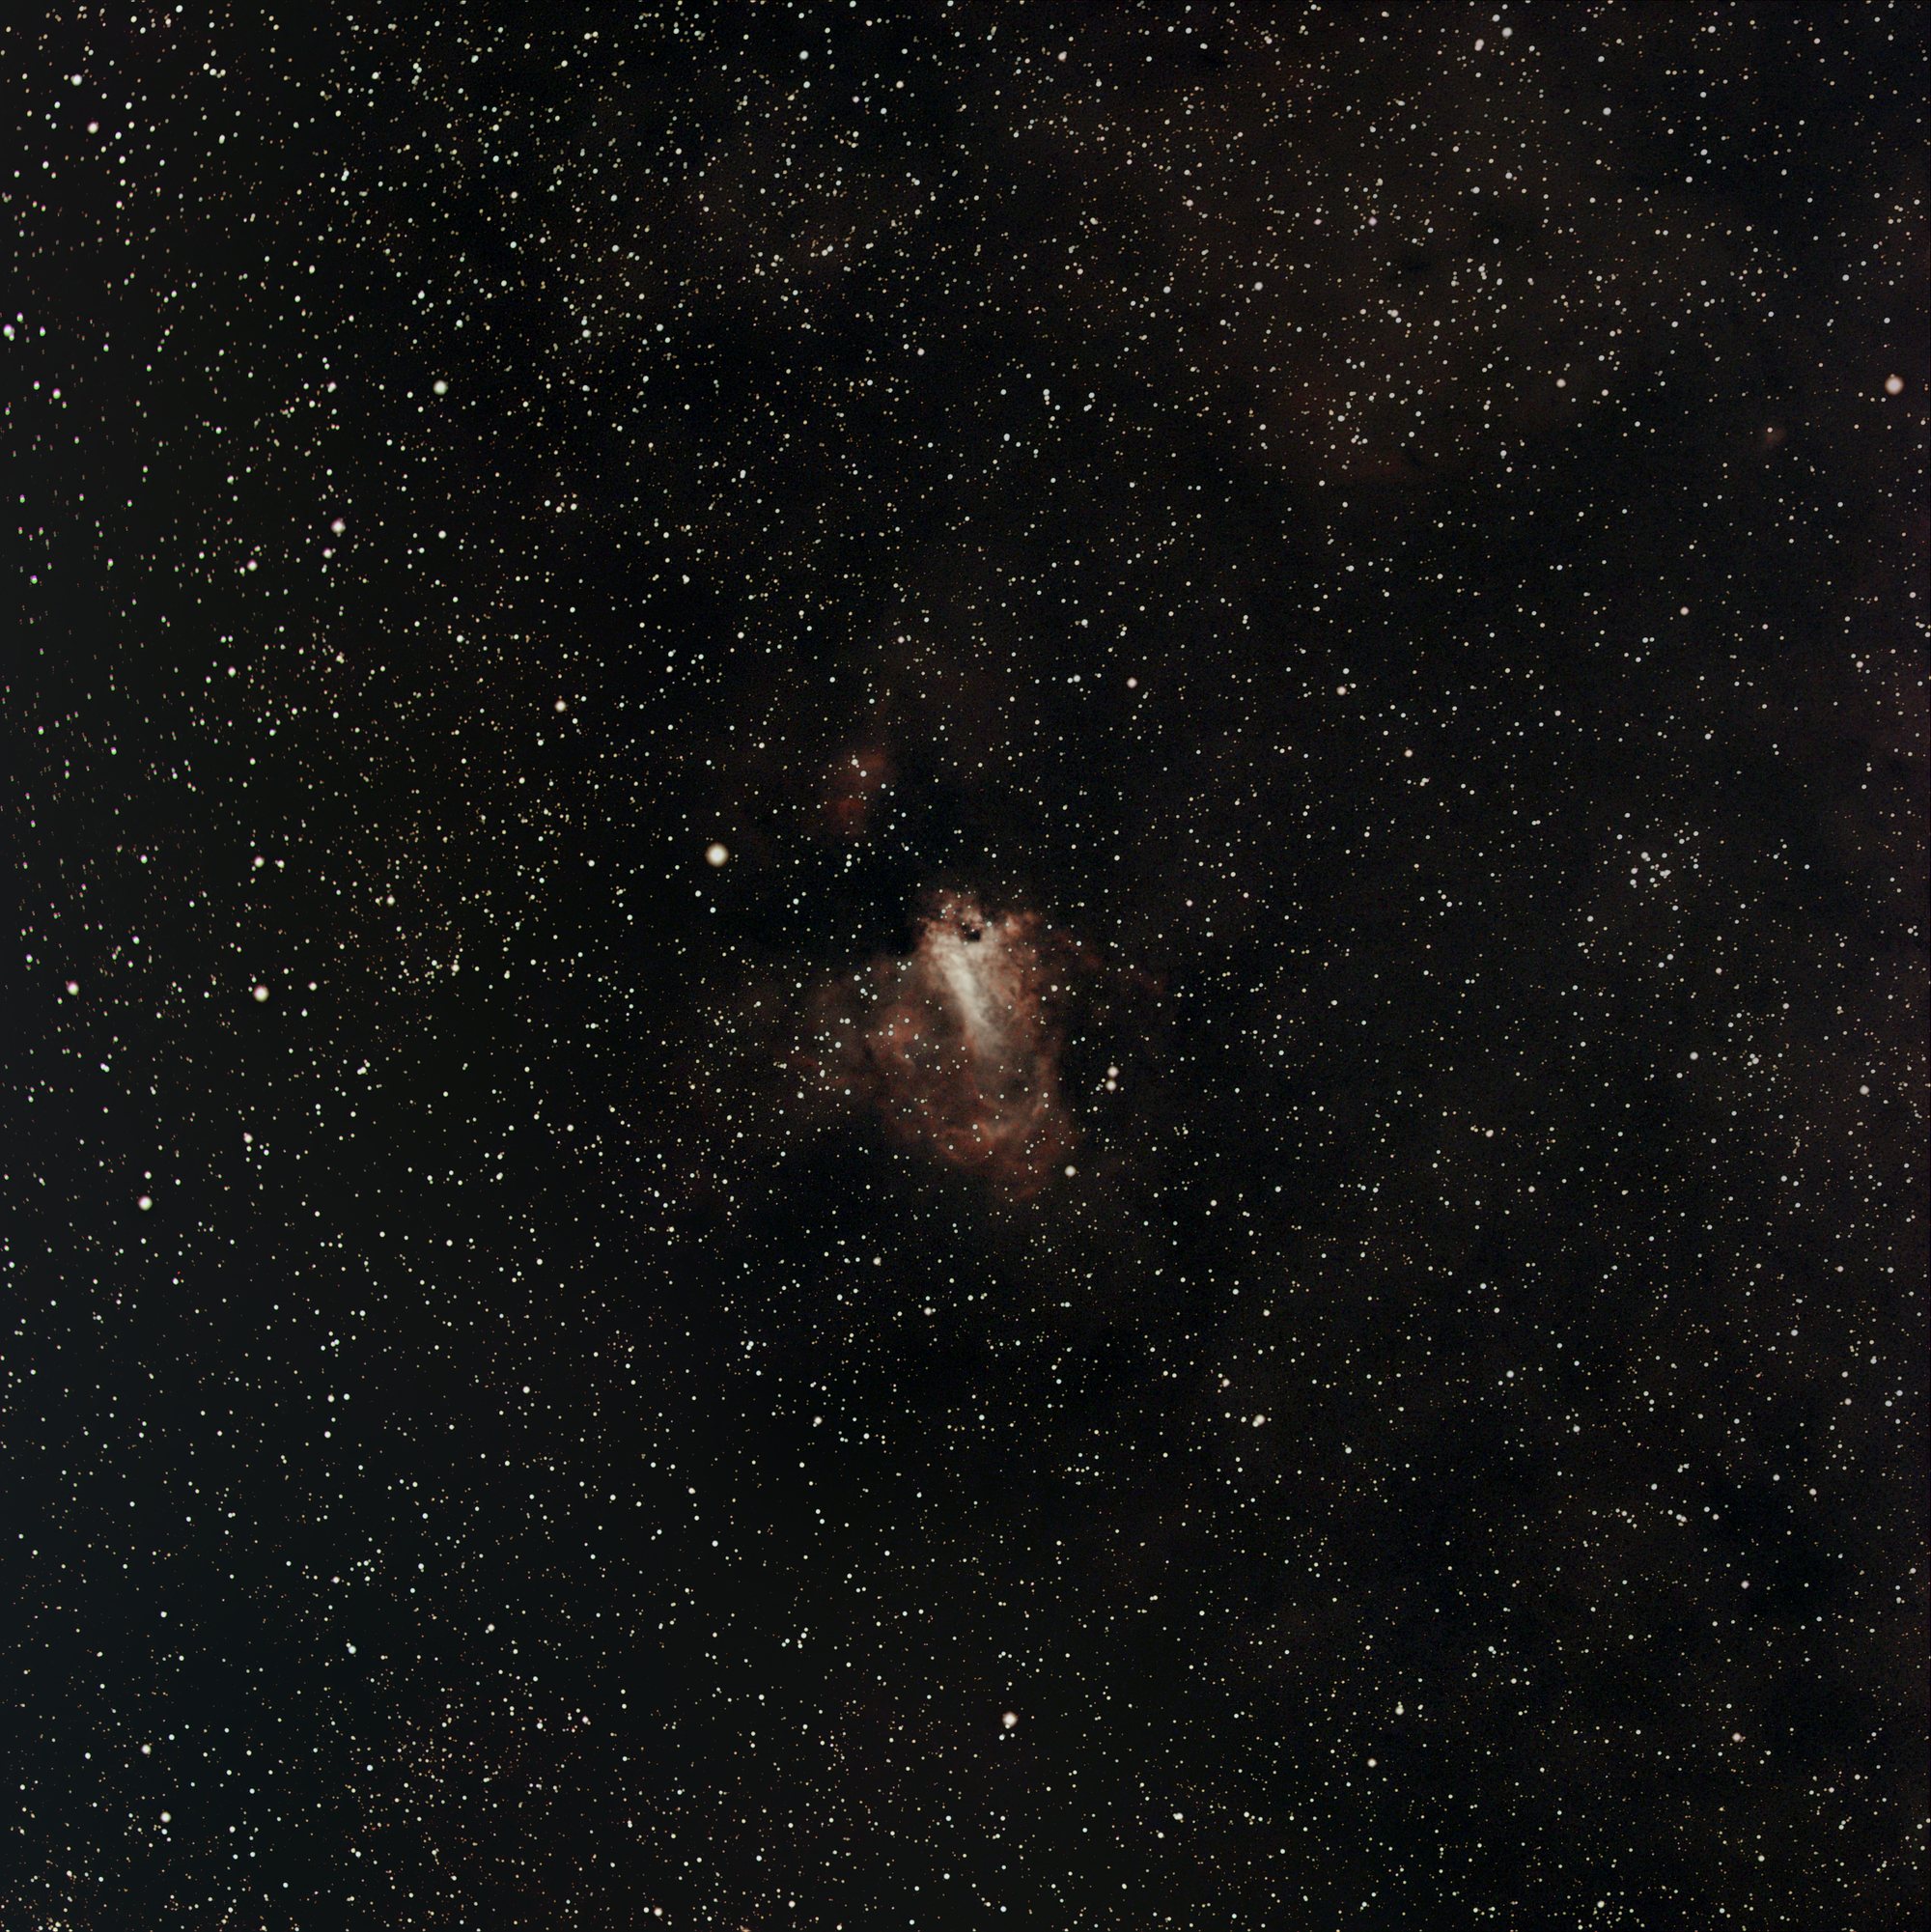
But I also had to get rid of so much information in order to hide the sensor noise and light pollution. The image is downright horrible compared to my latest integration (seen in this post's header and second in the gallery), and they were taken with only one session between them.
Unlocking the Cosmos
I became convinced narrowband imaging would solve all of my problems, so I picked up an Optolong L-eNhance filter. The writing was already on the wall for the DSLR, but this was the final straw: it barely captured any narrowband light. There was so little light that I couldn't even get the scope into focus.
My wife got her camera back, and I picked up an ZWO ASI533MC Pro astronomy camera along with a filter drawer to swap the L-eNhance in as needed. As it turns out, I've only used the filter a single time. When I did, the images weren't usable; I didn't realize focus would change when swapping in the filter, leaving me with a bunch of blurry subs.
Here's the thing: the camera was working so well, I no longer felt compelled to go narrowband. I will definitely use it at some point, but the camera alone greatly improved my results. I'm still having fun hitting new targets with ease and getting final images that astound me.
To recap, here's my final rig:
- William Optics Redcat 51 MK1.5
- ZWO ASI533MC Pro Astro Camera
- William Optics UniGuide 50mm
- ZWO ASI120MM Mini Guide Camera
- ZWO AM3 Mount
- Star Adventurer Tripod + Pier Extension
- ZWO ASIAIR Plus
- SVBONY Medium Dovetail Clamp
- ZWO 2 Inch Filter Drawer
- Optolong L-eNhance Filter
I absolutely love this rig, and don't think I'll be upgrading it. Shooting is absolutely seamless after setup and alignment, which takes about 15 minutes.
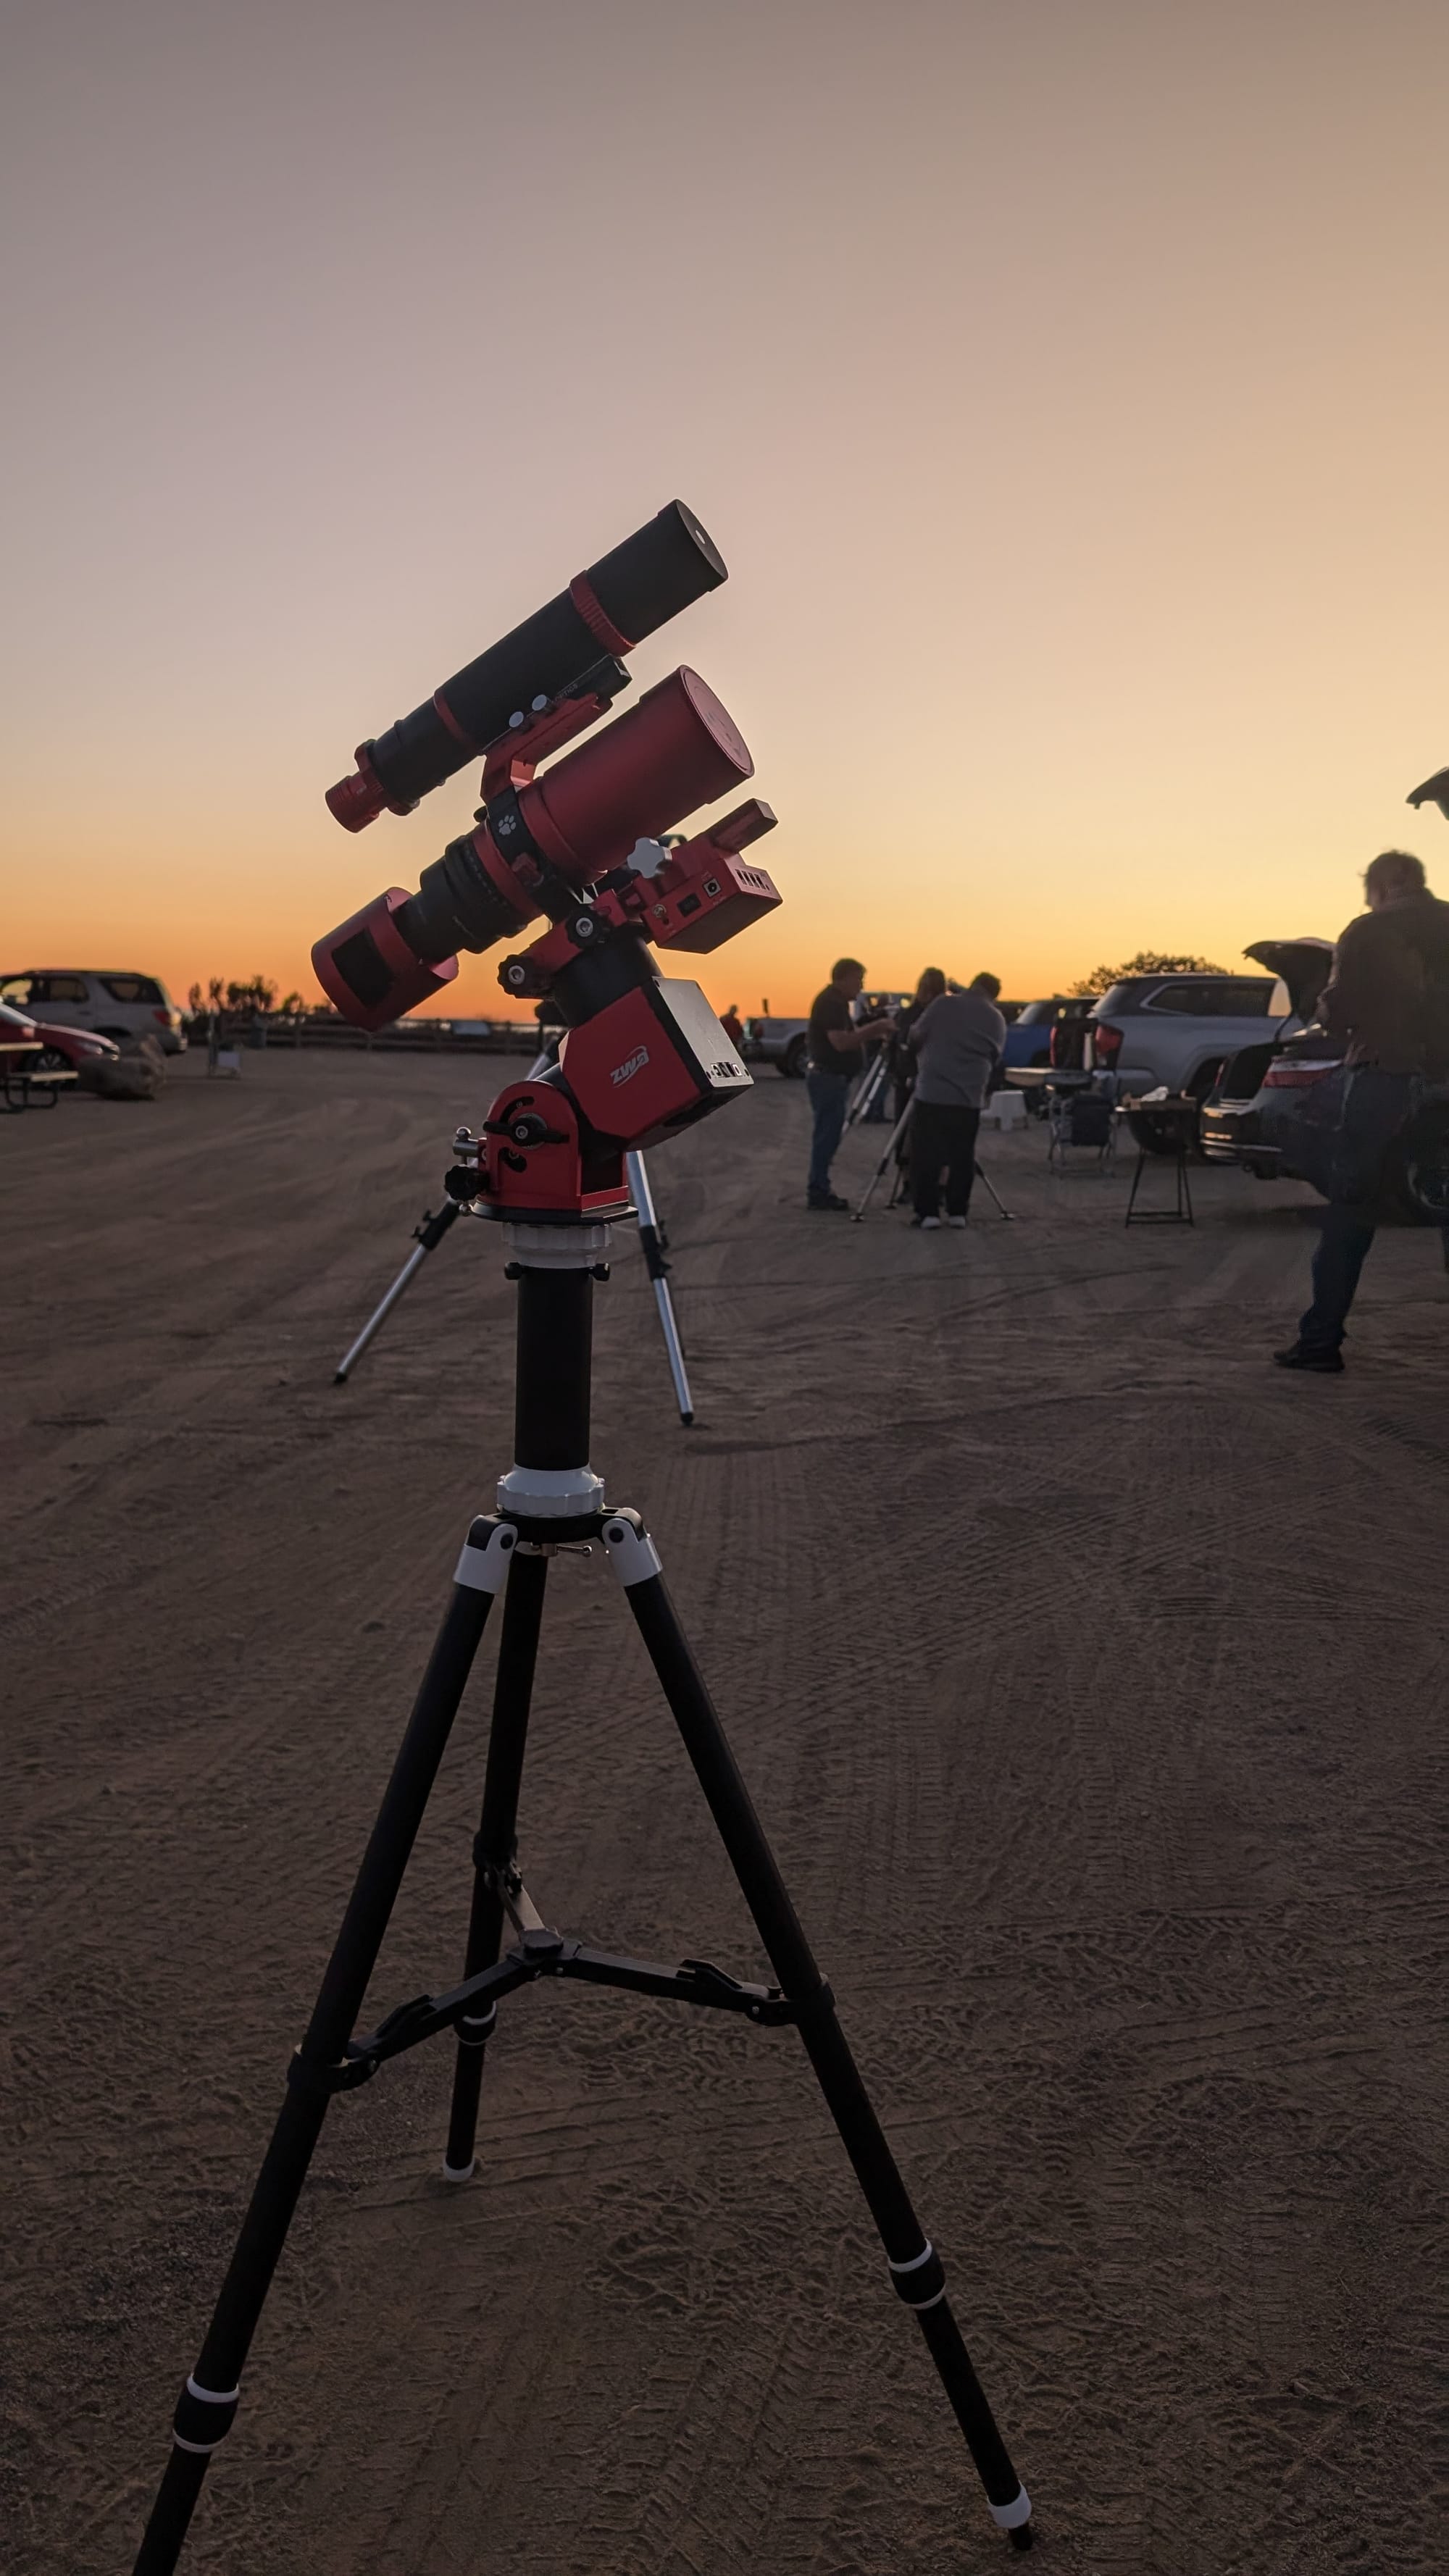
Setup and Focusing.
Rig Retrospective
While I am very happy with my current rig, I would do it differently if I could start over. Starting with a DSLR necessitated a separate guide scope, guide camera, and smart controller. I could have skipped all of those things and purchased the ZWO ASI2600MC Air instead.
Not only does that camera provide the same pixel size as my ASI533MC Pro on a much larger sensor, but it also contains a built-in ASIAIR and a secondary sensor dedicated to guiding (thus eliminating the guide scope and camera). It would have substantially reduced the number of cables and components, weighed less, and cut setup time in half.
The cost of my camera, guide camera, guide cope, and ASIAIR is around $1,500. The ASI2600MC Air is $2,000. In my opinion a 33% price increase would have been acceptable given all of the advantages, and my next rig will surely go that route.
The simple star tracker and DSLR setup can work if you are truly on a budget, are patient, and enjoy the process of fiddling with the hardware. If you, like me, can stomach spending a bit more for the right gear, it should only be a question of whether or not you'll actually use it. If so, eating the cost up-front is worth it in the long run.
If you can't stomach the cost, or if you're on the fence about a DSLR and don't already own one, the ZWO SeeStar is a very good alternative. It is a prebuilt, all-in-one scope that is controlled just like an ASIAIR-powered scope, and it only costs $500.
With that said, I'm not a non-astro photographer, and that influences my opinion. The DSLR route probably makes total sense for someone who already has one or more good DSLR cameras and the experience to use them, regardless of budget.
SDAA
I would be remiss if this blog didn't take the time to talk a bit about the San Diego Astronomy Association. After finalizing my rig and hitting all of the targets that I could from the narrow east-to-west arc of my yard, I began searching for nearby dark skies and star parties.
This search made me aware of the SDAA and I promptly joined as a full contributing member. This grants me year-round access to the private dark sky site Tierra del Sol—which I'll be visiting for the first time next week!—allows me to participate in a loaner scope program, provides the option to join a waiting list for a private pad, and allows access to their Cruzen Observatory (in due time, anyways).
The SDAA also hosts star parties multiple times per month, most of which are open to the public; no membership required! I have been to two so far, and have really enjoyed each experience.
The star parties have multiple experienced astronomers in attendance, along with many space-curious people. I really enjoy hearing the different "lessons" a lot of the astronomers give while putting the wonders of the universe on display for others, and I appreciate the amazing views I get through the variety of telescopes and binoculars that are available. My favorite moments are when I hear "this is the best night ever, space is so cool!" from children in attendance. I would've loved to have that experience as a kid.
To Infinity, and Beyond
I'm really happy with how far I've come with less than a dozen imaging sessions. In just a few short months I went from battling hiccups with my equipment to capturing the ethereal beauty of deep space. Every challenge a lesson, every victory the usher of a new challenge.
While I'm happy, I'm also left wanting. I can't wait to get out to dark skies, capture more targets, and work on much longer integrations. I'm excited to start using my narrowband filter, and aspire to eventually build a better rig that satisfies my aperture envy while accounting for my lessons learned. In any case, I'll be enjoying that sublime feeling that comes every time I capture a glimpse of the cosmos that is uniquely mine.
If you're considering starting your own journey into astronomy or astrophotography, my advice is to dive in head first. Build a setup that works for you, point it at the sky, and let the universe surprise you.